3.5. Retrieving the Objects at a Hit Location
Another common function will be to identify the
sprites that are contained in a specific location or the frontmost
sprite at a specific location. Once again, we can add functions for both
of these operations to the GameHost class.
The first, GetSpritesAtPoint, loops through
all the game objects looking for those that can be found at the
specified position. These are added to an array and returned to the
calling procedure. The code for this function is shown in Listing 11.
Example 11. Finding all the objects at a specified position
public SpriteObject[] GetSpritesAtPoint(Vector2 testPosition)
    {
        SpriteObject spriteObj;
        SpriteObject[] hits = new SpriteObject[GameObjects.Count];
        int hitCount = 0;

        // Loop for all of the SelectableSpriteObjects
        foreach (GameObjectBase obj in GameObjects)
        {
            // Is this a SpriteObject?
            if (obj is SpriteObject)
            {
                // Yes... Cast it to a SelectableSpriteObject
                spriteObj = (SpriteObject)obj;
                // Is the point in the object?
                if (spriteObj.IsPointInObject(testPosition))
                {
                    // Add to the array
                    hits[hitCount] = spriteObj;
                    hitCount += 1;
                }
            }
        }

        // Trim the empty space from the end of the array
        Array.Resize(ref hits, hitCount);

        return hits;
    }
|
The second function, GetSpriteAtPoint,
returns just a single sprite and attempts to find the frontmost sprite
at the specified location. It does this by keeping track of the LayerDepth value for each matching sprite. When subsequent sprites are ready to be checked, they are compared against the LayerDepth
of the previous matching sprite and ignored if the value is higher
(remember that lower values appear in front of higher values).
If LayerDepth values are found to be equal,
the check is still made, and the later sprite will supersede the earlier
sprite if it also matches the hit point. Because XNA will normally draw
sprites in the order requested when LayerDepth values match, later objects in the GameObjects
collection will appear in front of earlier objects with a matching
depth. This check therefore allows us to find the frontmost object even
if LayerDepths are not being used.
The GetSpriteAtPoint function is shown in Listing 12.
Example 12. Finding the frontmost sprite at a specified position
public SpriteObject GetSpriteAtPoint(Vector2 testPosition)
    {
        SpriteObject spriteObj;
        SpriteObject ret = null;
        float lowestLayerDepth = float.MaxValue;

        // Loop for all of the SelectableSpriteObjects
foreach (GameObjectBase obj in GameObjects)
        {
            // Is this a SpriteObject?
            if (obj is SpriteObject)
            {
                // Yes... Cast it to a SelectableSpriteObject
                spriteObj = (SpriteObject)obj;
                // Is its layerdepth the same or lower than the lowest we have seen so far?
                // If not, previously encountered objects are in front of this one
                // and so we have no need to check it.
                if (spriteObj.LayerDepth <= lowestLayerDepth)
                {
                    // Is the point in the object?
                    if (spriteObj.IsPointInObject(testPosition))
                    {
                        // Mark this as the current frontmost object
                        // and remember its layerdepth for future checks
                        ret = spriteObj;
                        lowestLayerDepth = spriteObj.LayerDepth;
                    }
                }
            }
        }

        return ret;
    }
|
3.6. Hit Testing Example Projects
The first, HitTesting, provides a demonstration of the accuracy of the hit testing functions that we have added to the SpriteObject class. A screenshot from this project can be seen in Figure 6.
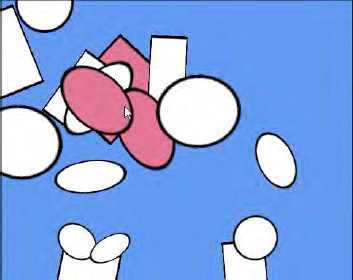
This example project creates a number of randomly
positioned sprites, some of which have a square texture, whereas others
have a circular texture. The sprites are rotated and scaled such that
they form rectangles and ellipses. The objects can be touched to select
them; all the objects that fall under the touch position will be
selected and highlighted in red.
The image in Figure 6
is taken from the emulator, and the mouse cursor can be seen selecting
some of the shapes that are displayed. The emulator is a great way to
accurately explore the edges of the shapes because the mouse cursor is
much more precise than a finger on a real device touch screen. You will
see that the object really is selected only when it is touched inside
its displayed shape and that the algorithms we are using for hit testing
work exactly as required.
Inside the HitTestingGame.Update method you will find that there are actually two possible calls to object selection functions, one of which is in use (calling SelectAllMatches); the other is commented out (calling SelectFrontmost). SelectAllMatches finds all the objects at the touch point using the GetSpritesAtPoint function and selects all of them, whereas SelectFrontmost uses GetSpriteAtPoint and selects just the one sprite returned (if there is one).
Try swapping these over so that SelectFrontmost
is called instead. You will find now that it is always the object in
front that is selected when multiple objects overlap, as described in
the previous section.
The project defines a new game object class called SelectableSpriteObject and adds to the basic SpriteObject functionality a new boolean property called Selected. It also overrides the SpriteColor
property and returns a red color when the sprite is selected or the
underlying sprite color if it is not. This simple class provides a
useful mechanism for selecting sprites and visually indicating which are
selected. We will use this same approach in the "Initiating Object Motion" section coming up in a moment.
The second example project, Balloons, turns the hit
testing into a simple interactive game. Colored balloons gently float up
the screen, and the player must pop them by touching them. This can be
quite relaxing until too many balloons start to reach the top of the
screen, at which point trying to pop them all becomes somewhat more
frantic! A screenshot from the project is shown in Figure 7.